> ## Documentation Index
> Fetch the complete documentation index at: https://docs.agno.com/llms.txt
> Use this file to discover all available pages before exploring further.
# Deploy to AWS
> Deploy AgentOS to AWS with ECS Fargate, RDS PostgreSQL, and a public endpoint.
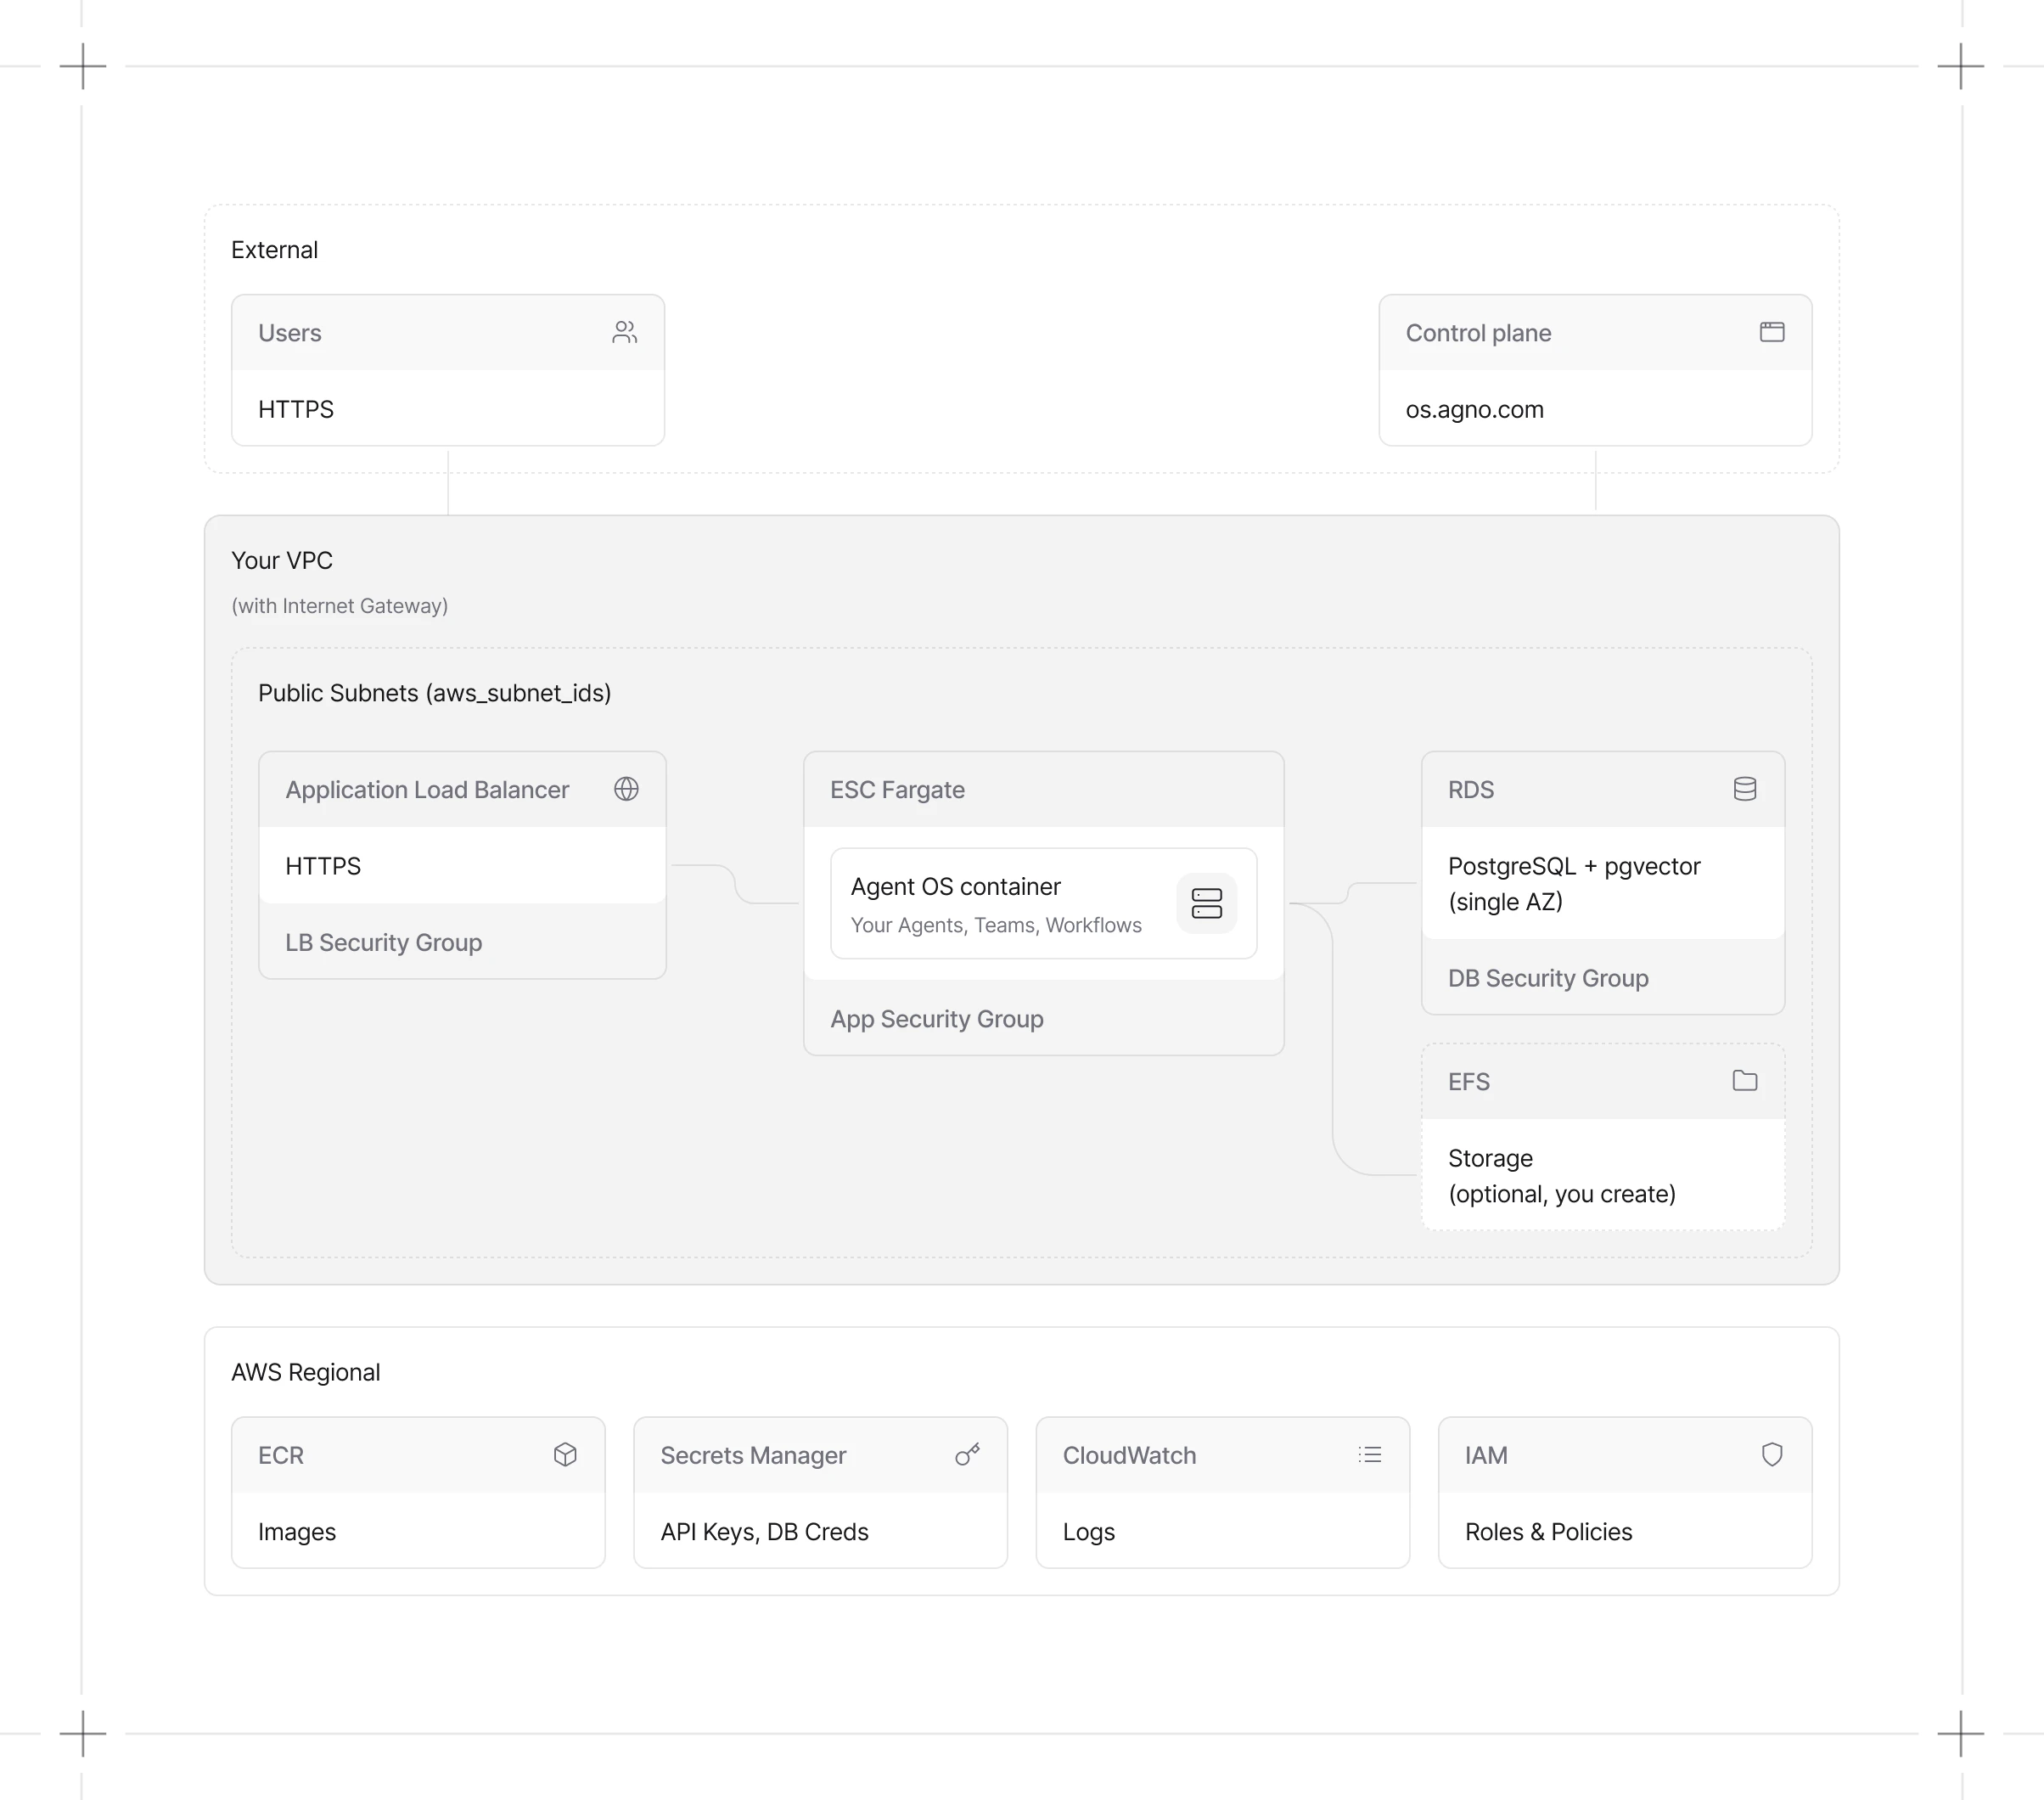
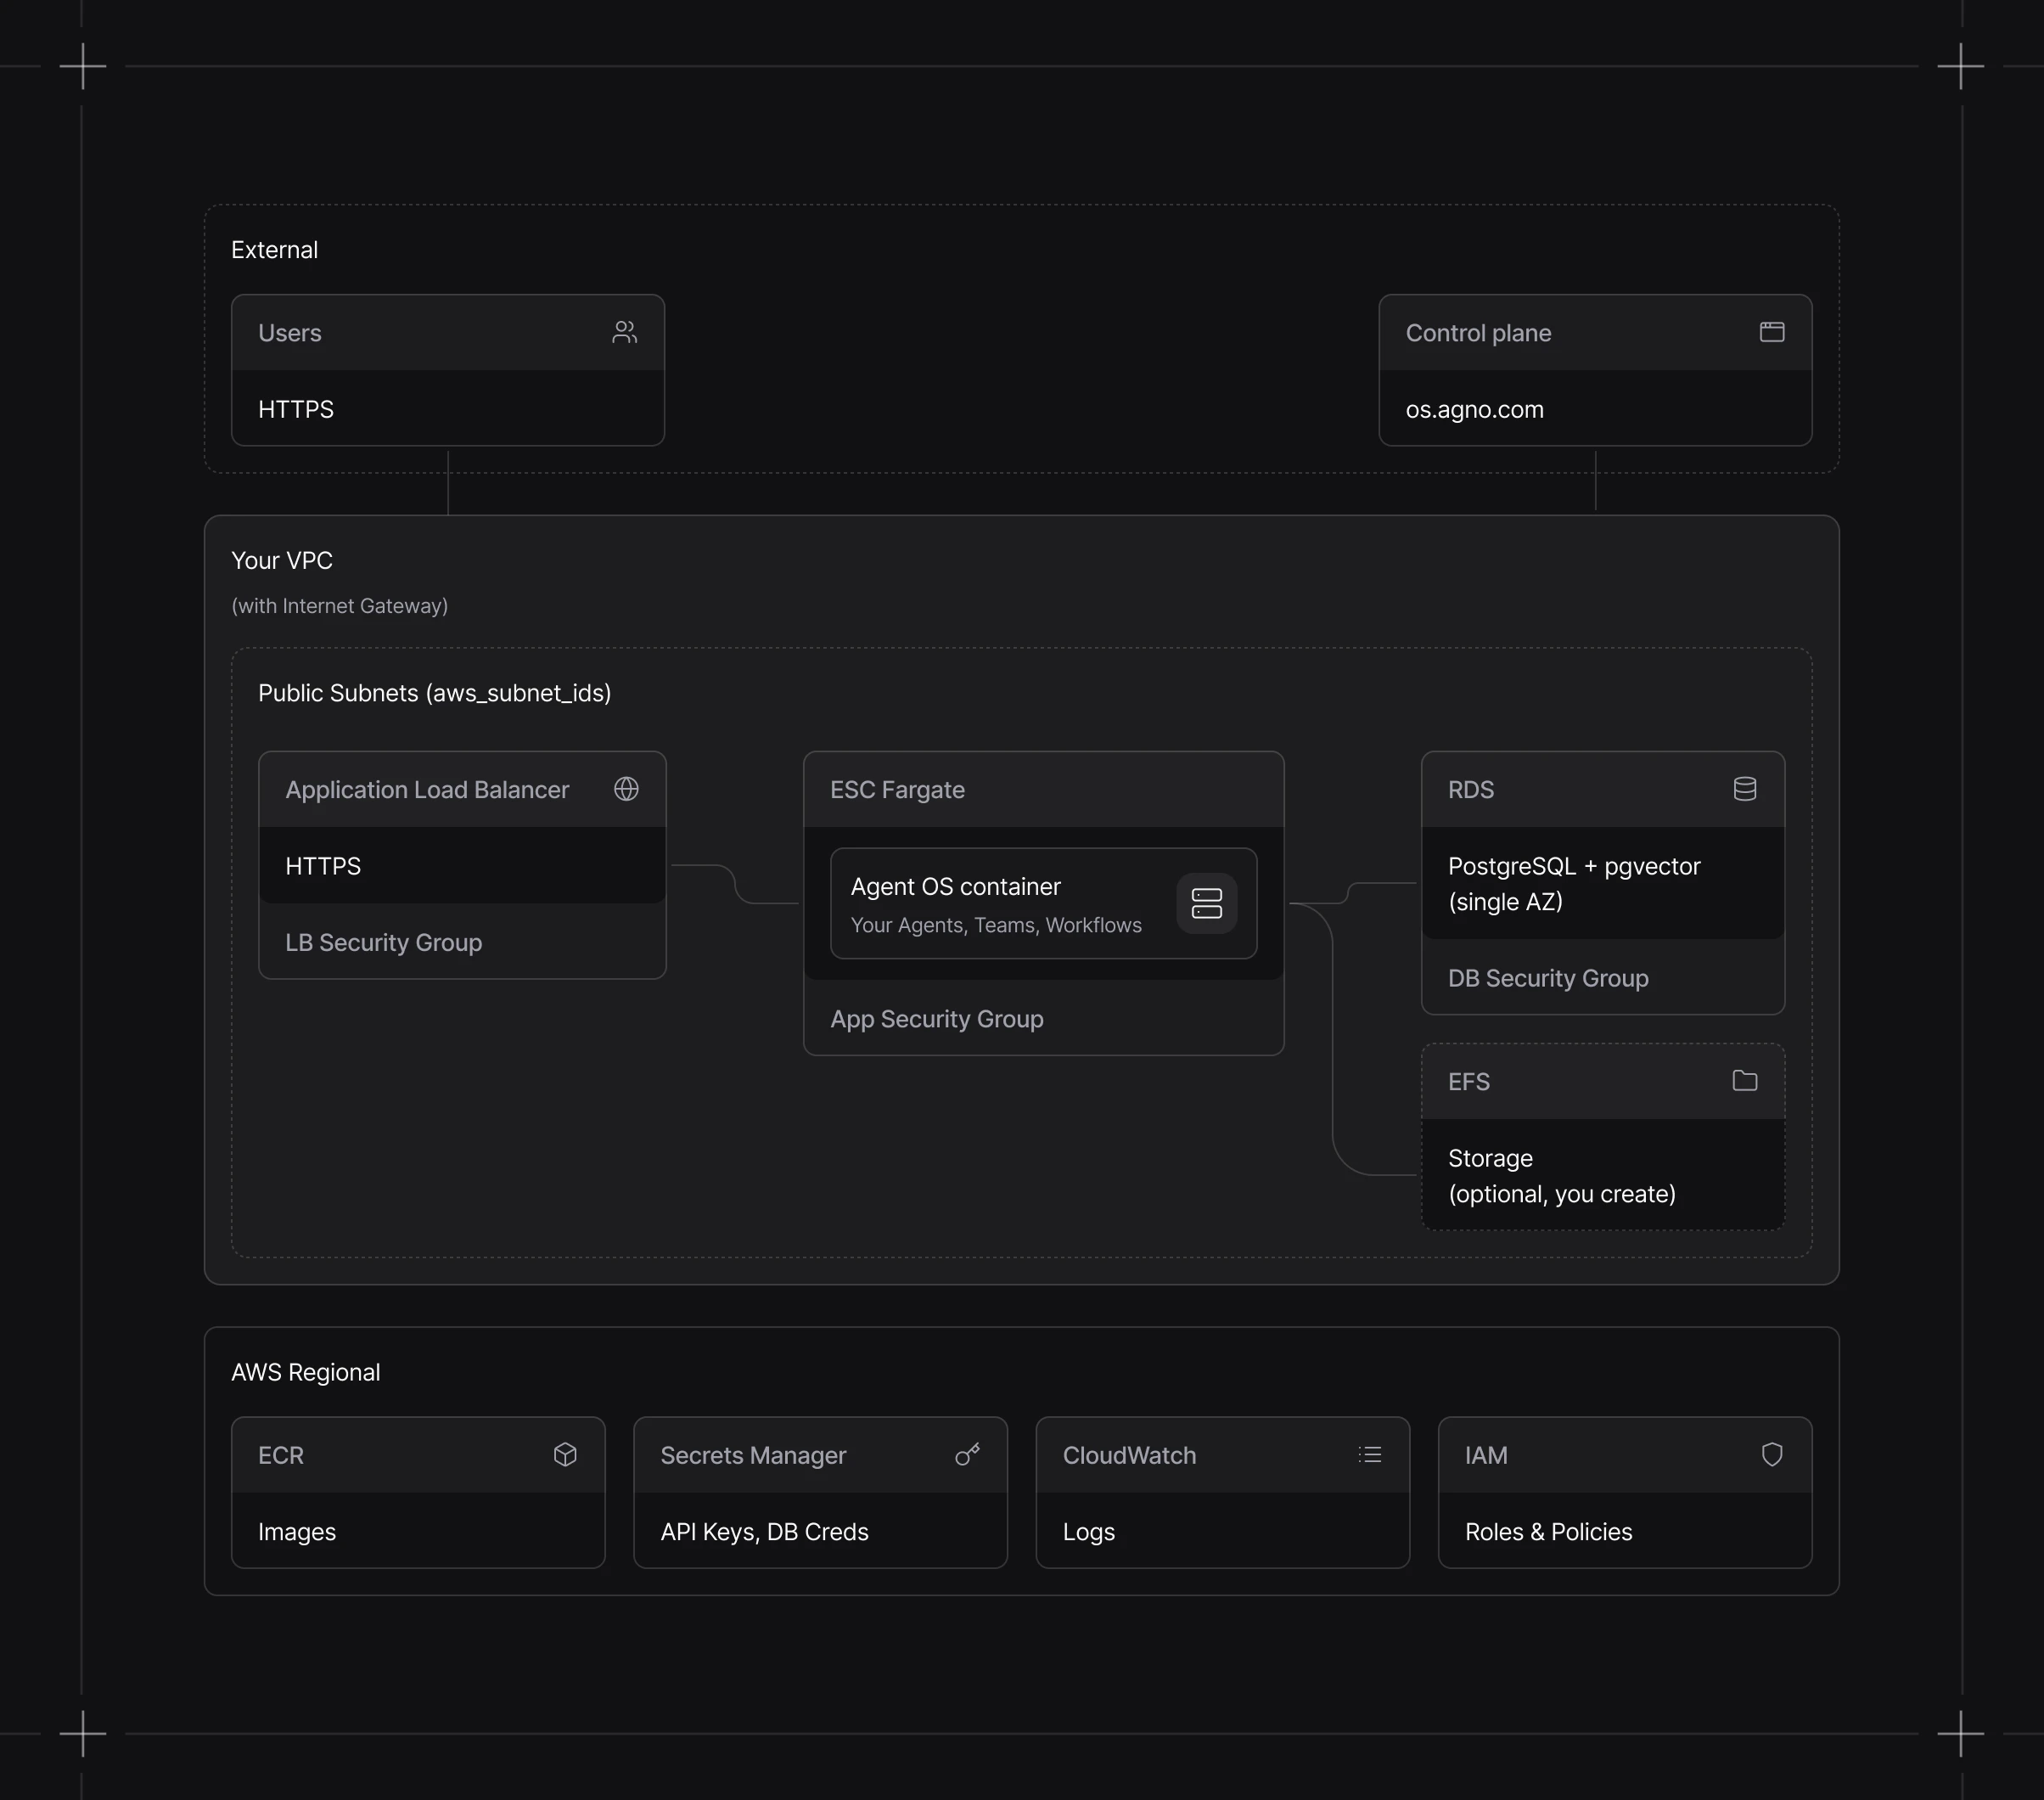
Deploy AgentOS to AWS with ECS Fargate, RDS PostgreSQL, and an Application Load Balancer. Production-grade infrastructure that runs entirely in your cloud.
The template includes agents you can extend with Claude Code:
| Agent | Pattern | Description |
| :--------- | :--------------- | :------------------------------------------------ |
| WebSearch | Direct tools | Search the web using Parallel SDK or keyless MCP. |
| CodeSearch | Context provider | Answer questions about this codebase. |
## Architecture
 ## Cost
| Resource | Purpose | Monthly Cost |
| ------------------------- | ------------------------------ | -------------- |
| ECS Fargate | Serverless container hosting | \$30-50 |
| RDS PostgreSQL | Managed database with pgvector | \$25 |
| Application Load Balancer | HTTP/HTTPS endpoint | \$20-25 |
| AWS Secrets Manager | Secure credential storage | \< \$1 |
| Security Groups | Network access controls | Free |
| **Total** | | **\~\$75-100** |
Use the [AWS Pricing Calculator](https://calculator.aws/) for detailed estimates.
***
## Prerequisites
* Install [Docker Desktop](https://docs.docker.com/desktop/install/mac-install/)
* Install [uv](https://docs.astral.sh/uv/) (Python package manager)
* Install and configure the [AWS CLI](https://docs.aws.amazon.com/cli/latest/userguide/getting-started-install.html)
```bash theme={null}
uv venv --python 3.12
source .venv/bin/activate
```
```bash theme={null}
uv pip install -U 'agno[infra]'
```
```bash theme={null}
ag infra create --template agentos-aws --name my-agentos
cd my-agentos
```
Or clone directly: `git clone https://github.com/agno-agi/agentos-aws-template.git`
```bash theme={null}
export OPENAI_API_KEY=sk-***
```
[HTTPS](/deploy/templates/aws/go-live/https) is required to connect
to os.agno.com. You'll set this up after deployment.
***
## Deploy
### Step 1: AWS Setup
Choose your preferred method to create the ECR repository and find your subnet IDs:
**Create ECR repository:**
1. Open [Amazon ECR](https://console.aws.amazon.com/ecr/)
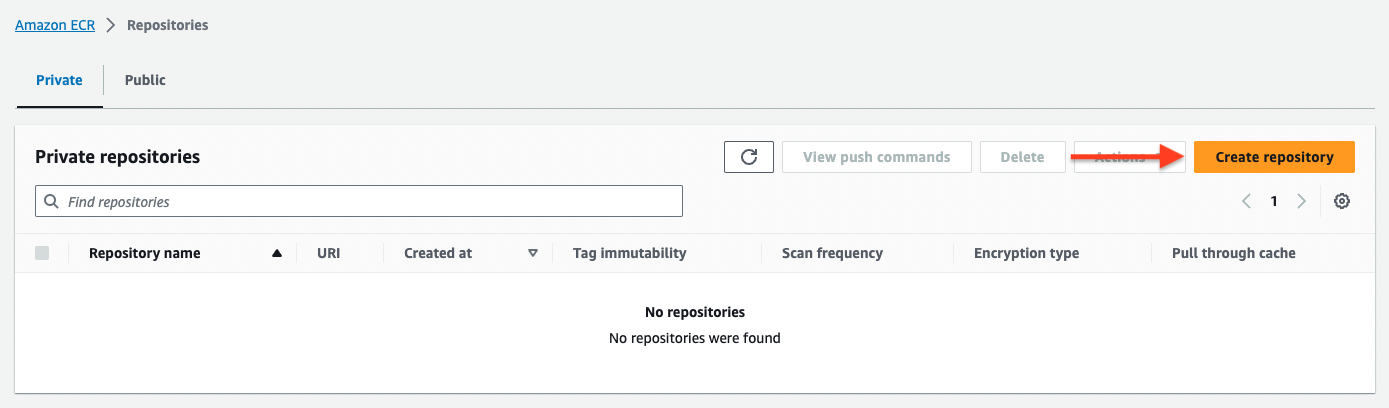
2. Click **Create repository**
3. Set repository name to `my-agentos`
4. Keep defaults and click **Create repository**
5. Copy the repository URI (e.g., `[ACCOUNT_ID].dkr.ecr.us-east-1.amazonaws.com/my-agentos`)
## Cost
| Resource | Purpose | Monthly Cost |
| ------------------------- | ------------------------------ | -------------- |
| ECS Fargate | Serverless container hosting | \$30-50 |
| RDS PostgreSQL | Managed database with pgvector | \$25 |
| Application Load Balancer | HTTP/HTTPS endpoint | \$20-25 |
| AWS Secrets Manager | Secure credential storage | \< \$1 |
| Security Groups | Network access controls | Free |
| **Total** | | **\~\$75-100** |
Use the [AWS Pricing Calculator](https://calculator.aws/) for detailed estimates.
***
## Prerequisites
* Install [Docker Desktop](https://docs.docker.com/desktop/install/mac-install/)
* Install [uv](https://docs.astral.sh/uv/) (Python package manager)
* Install and configure the [AWS CLI](https://docs.aws.amazon.com/cli/latest/userguide/getting-started-install.html)
```bash theme={null}
uv venv --python 3.12
source .venv/bin/activate
```
```bash theme={null}
uv pip install -U 'agno[infra]'
```
```bash theme={null}
ag infra create --template agentos-aws --name my-agentos
cd my-agentos
```
Or clone directly: `git clone https://github.com/agno-agi/agentos-aws-template.git`
```bash theme={null}
export OPENAI_API_KEY=sk-***
```
[HTTPS](/deploy/templates/aws/go-live/https) is required to connect
to os.agno.com. You'll set this up after deployment.
***
## Deploy
### Step 1: AWS Setup
Choose your preferred method to create the ECR repository and find your subnet IDs:
**Create ECR repository:**
1. Open [Amazon ECR](https://console.aws.amazon.com/ecr/)
2. Click **Create repository**
3. Set repository name to `my-agentos`
4. Keep defaults and click **Create repository**
5. Copy the repository URI (e.g., `[ACCOUNT_ID].dkr.ecr.us-east-1.amazonaws.com/my-agentos`)
 **Authenticate Docker with ECR:**
Click **View push commands** in the ECR console and run the login command:
```bash theme={null}
aws ecr get-login-password --region us-east-1 | \
docker login --username AWS --password-stdin \
[ACCOUNT_ID].dkr.ecr.us-east-1.amazonaws.com
```
ECR tokens expire after 12 hours. Re-run this command if you get
authentication errors.
**Find your subnet IDs:**
1. Open [VPC Console](https://console.aws.amazon.com/vpc/) → **Subnets**
2. Look for subnets with **Auto-assign public IP** = Yes
3. Note the Subnet IDs for 2+ subnets in different availability zones
Public subnets typically have "public" in their name or have a route to an
Internet Gateway.
**Create ECR repository:**
```bash theme={null}
aws ecr create-repository \
--repository-name my-agentos \
--region us-east-1
```
Note your ECR URL from the output:
```
[ACCOUNT_ID].dkr.ecr.us-east-1.amazonaws.com
```
**Authenticate Docker with ECR:**
```bash theme={null}
aws ecr get-login-password --region us-east-1 | \
docker login --username AWS --password-stdin \
[ACCOUNT_ID].dkr.ecr.us-east-1.amazonaws.com
```
ECR tokens expire after 12 hours. Re-run this command if you get
authentication errors.
**Find your subnet IDs:**
```bash theme={null}
aws ec2 describe-subnets --query 'Subnets[*].[SubnetId,AvailabilityZone,MapPublicIpOnLaunch]' --output table
```
Choose subnets where `MapPublicIpOnLaunch` is `True`. Select subnets in
different availability zones for high availability.
### Step 2: Configure
Edit `infra/settings.py` with your AWS details:
```python theme={null}
infra_settings = InfraSettings(
infra_name="my-agentos",
aws_region="us-east-1",
aws_subnet_ids=["subnet-xxx", "subnet-yyy"], # Your subnet IDs
image_repo="[ACCOUNT_ID].dkr.ecr.us-east-1.amazonaws.com",
push_images=True,
)
```
```bash theme={null}
cp infra/secrets/prd_api_secrets.example.yml infra/secrets/prd_api_secrets.yml
cp infra/secrets/prd_db_secrets.example.yml infra/secrets/prd_db_secrets.yml
```
Edit both files with your credentials. See [Secrets](/deploy/templates/aws/configure/secrets) for details.
### Step 3: Test & Deploy
```bash theme={null}
ag infra up
```
Open [http://localhost:8000/docs](http://localhost:8000/docs) to verify your agents load correctly.
```bash theme={null}
ag infra up prd:aws
```
Press Enter to confirm. This creates:
* Docker image pushed to ECR
* RDS PostgreSQL instance with pgvector
* ECS Cluster, Service, and Task Definition
* Application Load Balancer with Target Group
* Security Groups for network isolation
RDS takes 5-10 minutes to provision. The deployment will wait for it
automatically.
### Step 4: Get Your Endpoint
1. Open [EC2 Console](https://console.aws.amazon.com/ec2/) → **Load Balancers**
2. Find your load balancer (named `my-agentos-...`)
3. Copy the **DNS name**
Test your deployment:
```bash theme={null}
curl http://[LOAD_BALANCER_DNS]/health
```
```bash theme={null}
aws elbv2 describe-load-balancers \
--query 'LoadBalancers[?contains(LoadBalancerName, `my-agentos`)].DNSName' \
--output text
```
Test your deployment:
```bash theme={null}
curl http://[LOAD_BALANCER_DNS]/health
```
Should return: `{"status": "ok", "instantiated_at": "..."}`
***
## Next Steps
Build and improve agents with Claude Code and evals.
Connect Slack, Discord, WhatsApp, or MCP.
Region, subnets, and ECR
Run your agents in the cloud
Confirm everything works
***
## Troubleshooting
ECR tokens expire after 12 hours. Re-run the authentication command:
```bash theme={null}
aws ecr get-login-password --region us-east-1 | \
docker login --username AWS --password-stdin \
[ACCOUNT_ID].dkr.ecr.us-east-1.amazonaws.com
```
RDS typically takes 5-10 minutes. Check status in [RDS
Console](https://console.aws.amazon.com/rds/) → Databases. Look for the
database status to change from "Creating" to "Available".
Public subnets have a route to an Internet Gateway. In the VPC Console: 1. Go
to **Route Tables** 2. Find tables with a route to `igw-xxx` (Internet
Gateway) 3. Check which subnets are associated with those route tables
The container may still be starting. Wait 2-3 minutes and retry.
If it persists, check ECS task logs:
1. Open [ECS Console](https://console.aws.amazon.com/ecs/) → Clusters → `my-agentos`
2. Click on the running task
3. Go to **Logs** tab to see container output
This usually indicates the container is crashing. Common causes:
* Missing environment variables (check your secrets files)
* Invalid API keys
* Database connection issues
Check the **Stopped** tasks in ECS Console for error messages.
**Authenticate Docker with ECR:**
Click **View push commands** in the ECR console and run the login command:
```bash theme={null}
aws ecr get-login-password --region us-east-1 | \
docker login --username AWS --password-stdin \
[ACCOUNT_ID].dkr.ecr.us-east-1.amazonaws.com
```
ECR tokens expire after 12 hours. Re-run this command if you get
authentication errors.
**Find your subnet IDs:**
1. Open [VPC Console](https://console.aws.amazon.com/vpc/) → **Subnets**
2. Look for subnets with **Auto-assign public IP** = Yes
3. Note the Subnet IDs for 2+ subnets in different availability zones
Public subnets typically have "public" in their name or have a route to an
Internet Gateway.
**Create ECR repository:**
```bash theme={null}
aws ecr create-repository \
--repository-name my-agentos \
--region us-east-1
```
Note your ECR URL from the output:
```
[ACCOUNT_ID].dkr.ecr.us-east-1.amazonaws.com
```
**Authenticate Docker with ECR:**
```bash theme={null}
aws ecr get-login-password --region us-east-1 | \
docker login --username AWS --password-stdin \
[ACCOUNT_ID].dkr.ecr.us-east-1.amazonaws.com
```
ECR tokens expire after 12 hours. Re-run this command if you get
authentication errors.
**Find your subnet IDs:**
```bash theme={null}
aws ec2 describe-subnets --query 'Subnets[*].[SubnetId,AvailabilityZone,MapPublicIpOnLaunch]' --output table
```
Choose subnets where `MapPublicIpOnLaunch` is `True`. Select subnets in
different availability zones for high availability.
### Step 2: Configure
Edit `infra/settings.py` with your AWS details:
```python theme={null}
infra_settings = InfraSettings(
infra_name="my-agentos",
aws_region="us-east-1",
aws_subnet_ids=["subnet-xxx", "subnet-yyy"], # Your subnet IDs
image_repo="[ACCOUNT_ID].dkr.ecr.us-east-1.amazonaws.com",
push_images=True,
)
```
```bash theme={null}
cp infra/secrets/prd_api_secrets.example.yml infra/secrets/prd_api_secrets.yml
cp infra/secrets/prd_db_secrets.example.yml infra/secrets/prd_db_secrets.yml
```
Edit both files with your credentials. See [Secrets](/deploy/templates/aws/configure/secrets) for details.
### Step 3: Test & Deploy
```bash theme={null}
ag infra up
```
Open [http://localhost:8000/docs](http://localhost:8000/docs) to verify your agents load correctly.
```bash theme={null}
ag infra up prd:aws
```
Press Enter to confirm. This creates:
* Docker image pushed to ECR
* RDS PostgreSQL instance with pgvector
* ECS Cluster, Service, and Task Definition
* Application Load Balancer with Target Group
* Security Groups for network isolation
RDS takes 5-10 minutes to provision. The deployment will wait for it
automatically.
### Step 4: Get Your Endpoint
1. Open [EC2 Console](https://console.aws.amazon.com/ec2/) → **Load Balancers**
2. Find your load balancer (named `my-agentos-...`)
3. Copy the **DNS name**
Test your deployment:
```bash theme={null}
curl http://[LOAD_BALANCER_DNS]/health
```
```bash theme={null}
aws elbv2 describe-load-balancers \
--query 'LoadBalancers[?contains(LoadBalancerName, `my-agentos`)].DNSName' \
--output text
```
Test your deployment:
```bash theme={null}
curl http://[LOAD_BALANCER_DNS]/health
```
Should return: `{"status": "ok", "instantiated_at": "..."}`
***
## Next Steps
Build and improve agents with Claude Code and evals.
Connect Slack, Discord, WhatsApp, or MCP.
Region, subnets, and ECR
Run your agents in the cloud
Confirm everything works
***
## Troubleshooting
ECR tokens expire after 12 hours. Re-run the authentication command:
```bash theme={null}
aws ecr get-login-password --region us-east-1 | \
docker login --username AWS --password-stdin \
[ACCOUNT_ID].dkr.ecr.us-east-1.amazonaws.com
```
RDS typically takes 5-10 minutes. Check status in [RDS
Console](https://console.aws.amazon.com/rds/) → Databases. Look for the
database status to change from "Creating" to "Available".
Public subnets have a route to an Internet Gateway. In the VPC Console: 1. Go
to **Route Tables** 2. Find tables with a route to `igw-xxx` (Internet
Gateway) 3. Check which subnets are associated with those route tables
The container may still be starting. Wait 2-3 minutes and retry.
If it persists, check ECS task logs:
1. Open [ECS Console](https://console.aws.amazon.com/ecs/) → Clusters → `my-agentos`
2. Click on the running task
3. Go to **Logs** tab to see container output
This usually indicates the container is crashing. Common causes:
* Missing environment variables (check your secrets files)
* Invalid API keys
* Database connection issues
Check the **Stopped** tasks in ECS Console for error messages.